If you’re deploying a Windows x86 (32-bit) .NET app, you’re probably used to hosting it on a VM with IIS. While deploying the same app as a container is possible, it’s not straightforward. This post will walk you through deploying a 32-bit .NET 8 app as a container in Azure using Azure App Service.
TLDR;#
Find the code here: github.
Creating the Dockerfile#
The first step is to create a Docker image for the app. You’ll need to use Windows Server Core as the base image because the Nano edition doesn’t support x86 applications. Note that there are no .NET base images with the x86 runtime, so you’ll have to manually install the .NET and ASP.NET runtimes.
Here’s the Dockerfile:
 1
 2
 3
 4
 5
 6
 7
 8
 9
10
11
12
13
14
15
16
17
18
19
20
21
22
23
24
25
26
27
28
29
30
31
32
33
34
35
36
37
38
39
40
41
42
43
44
45
46
47
48
49
50
51
52
53
54
55
56
57
58
59
60
61
62
63
64
65
66
67
68
69
70
71
72
73
74
75
76
| # escape=`
# For runtime layer, reference latest Windows Server Core as base image
FROM mcr.microsoft.com/windows/servercore:ltsc2022-amd64 as base-runtime
ENV `
# Configure web servers to bind to port 8080 when present
ASPNETCORE_HTTP_PORTS=8080 `
# Enable detection of running in a container
DOTNET_RUNNING_IN_CONTAINER=true `
# .NET Runtime version
DOTNET_VERSION=8.0.11 `
# ASP.NET Core version
ASPNET_VERSION=8.0.11
# The base server core image doesn't have .NET. Install .NET runtime
# This snippet of code was pulled from official 64 bit image and adapted
# to download .NET Runtime 32 bit version.
RUN powershell -Command `
$ErrorActionPreference = 'Stop'; `
$ProgressPreference = 'SilentlyContinue'; `
`
Invoke-WebRequest -OutFile dotnet.zip https://dotnetcli.azureedge.net/dotnet/Runtime/$Env:DOTNET_VERSION/dotnet-runtime-$Env:DOTNET_VERSION-win-x86.zip; `
$dotnet_sha512 = 'CB80A41EA64DB17F2CC21390FEFEAC7342E965FBA3BB6F768C51FDCF7271FBD1399EAAF33EC1162BC206E47BC8D296D28DDAD2139C8A770D02E62FA90AF49A32'; `
if ((Get-FileHash dotnet.zip -Algorithm sha512).Hash -ne $dotnet_sha512) { `
Write-Host 'CHECKSUM VERIFICATION FAILED!'; `
exit 1; `
}; `
`
mkdir $Env:ProgramFiles\dotnet; `
tar -oxzf dotnet.zip -C $Env:ProgramFiles\dotnet; `
Remove-Item -Force dotnet.zip
# Install ASP.NET Core Runtime
# This snippet of code was pulled from official 64 bit image and adapted
# to download .NET Runtime 32 bit version.
RUN powershell -Command `
$ErrorActionPreference = 'Stop'; `
$ProgressPreference = 'SilentlyContinue'; `
`
Invoke-WebRequest -OutFile aspnetcore.zip https://dotnetcli.azureedge.net/dotnet/aspnetcore/Runtime/$Env:ASPNET_VERSION/aspnetcore-runtime-$Env:ASPNET_VERSION-win-x86.zip; `
$aspnetcore_sha512 = 'C0399CF5B217703F1142F3D44A29EB443621F6038FA1BF602C3C661B5A55C13F18A74F90A6ABC3D1C1E1B6A4232A7AB7B9BB19BA7F3454387097E98F79B5FDD2'; `
if ((Get-FileHash aspnetcore.zip -Algorithm sha512).Hash -ne $aspnetcore_sha512) { `
Write-Host 'CHECKSUM VERIFICATION FAILED!'; `
exit 1; `
}; `
`
tar -oxzf aspnetcore.zip -C $Env:ProgramFiles\dotnet ./shared/Microsoft.AspNetCore.App; `
Remove-Item -Force aspnetcore.zip
# Add .NET runtime to PATH
RUN setx /M PATH "%PATH%;C:\Program Files\dotnet"
# Ensure to set DOTNET_ROOT to the path where the .NET runtime is installed
# Without this step, the app will not run
RUN setx /M DOTNET_ROOT "C:\Program Files\dotnet"
# Use regular .NET SDK image to build the app
FROM mcr.microsoft.com/dotnet/sdk:8.0-windowsservercore-ltsc2022 AS sdk
WORKDIR /app
# If you need to register a COM DLL as it is often done with 32 bit apps (register for build)
# RUN %systemroot%\SysWoW64\regsvr32.exe /S C:\src\lib\My32COM.dll
COPY ./ ./
# Assumes the app is already setup to build as 32 bit.
RUN dotnet publish -c Release -o out
FROM base-runtime as runtime
WORKDIR /app
COPY --from=sdk /app/out .
# If you need to register a COM DLL as it is often done with 32 bit apps (register for runtime)
# RUN %systemroot%\SysWoW64\regsvr32.exe /S C:\src\lib\My32COM.dll
# It's a windows app, run the exe directly
ENTRYPOINT ["winx86-container.exe"]
|
Building with Azure Container Registry (ACR)#
Instead of building the image locally and uploading it (which can take time due to its ~5GB size), you can build it directly in ACR with the az acr build command:
1
| az acr build -t x86demo:1.0.0 -r myacr . --platform windows
|
Deploying to Azure#
You can deploy Windows containers to either a Kubernetes cluster or an Azure App Service. In this guide, we’ll use Azure App Service.
Step 1: Create a Windows App Service Plan#
Only Premium v3 (P1V3) plans or higher support Windows containers:
1
| az appservice plan create -g rg-x86app-scus-001 -n wp-x86app-scus-001 --sku P1V3
|
Step 2: Create and Deploy the Web App#
1
2
3
4
5
6
7
8
| # Deploy the actual web app including a system assigned identity
az webapp create -g rg-x86app-scus-001 `
-p wp-x86app-scus-001 `
-n web-winx86-scus-001 `
-i myacr.azurecr.io/x86demo:1.0.0 `
--assign-identity [system] `
--acr-use-identity `
--acr-identity [system]
|
Step 3: Expose Port 8080#
Configure the App Service to use port 8080 of the container:
1
2
3
| az webapp config appsettings set -g rg-x86app-scus-001 `
-n web-winx86-scus-001 `
--settings WEBSITES_PORT=8080
|
Step 4: Grant acrpull Role to the App Service#
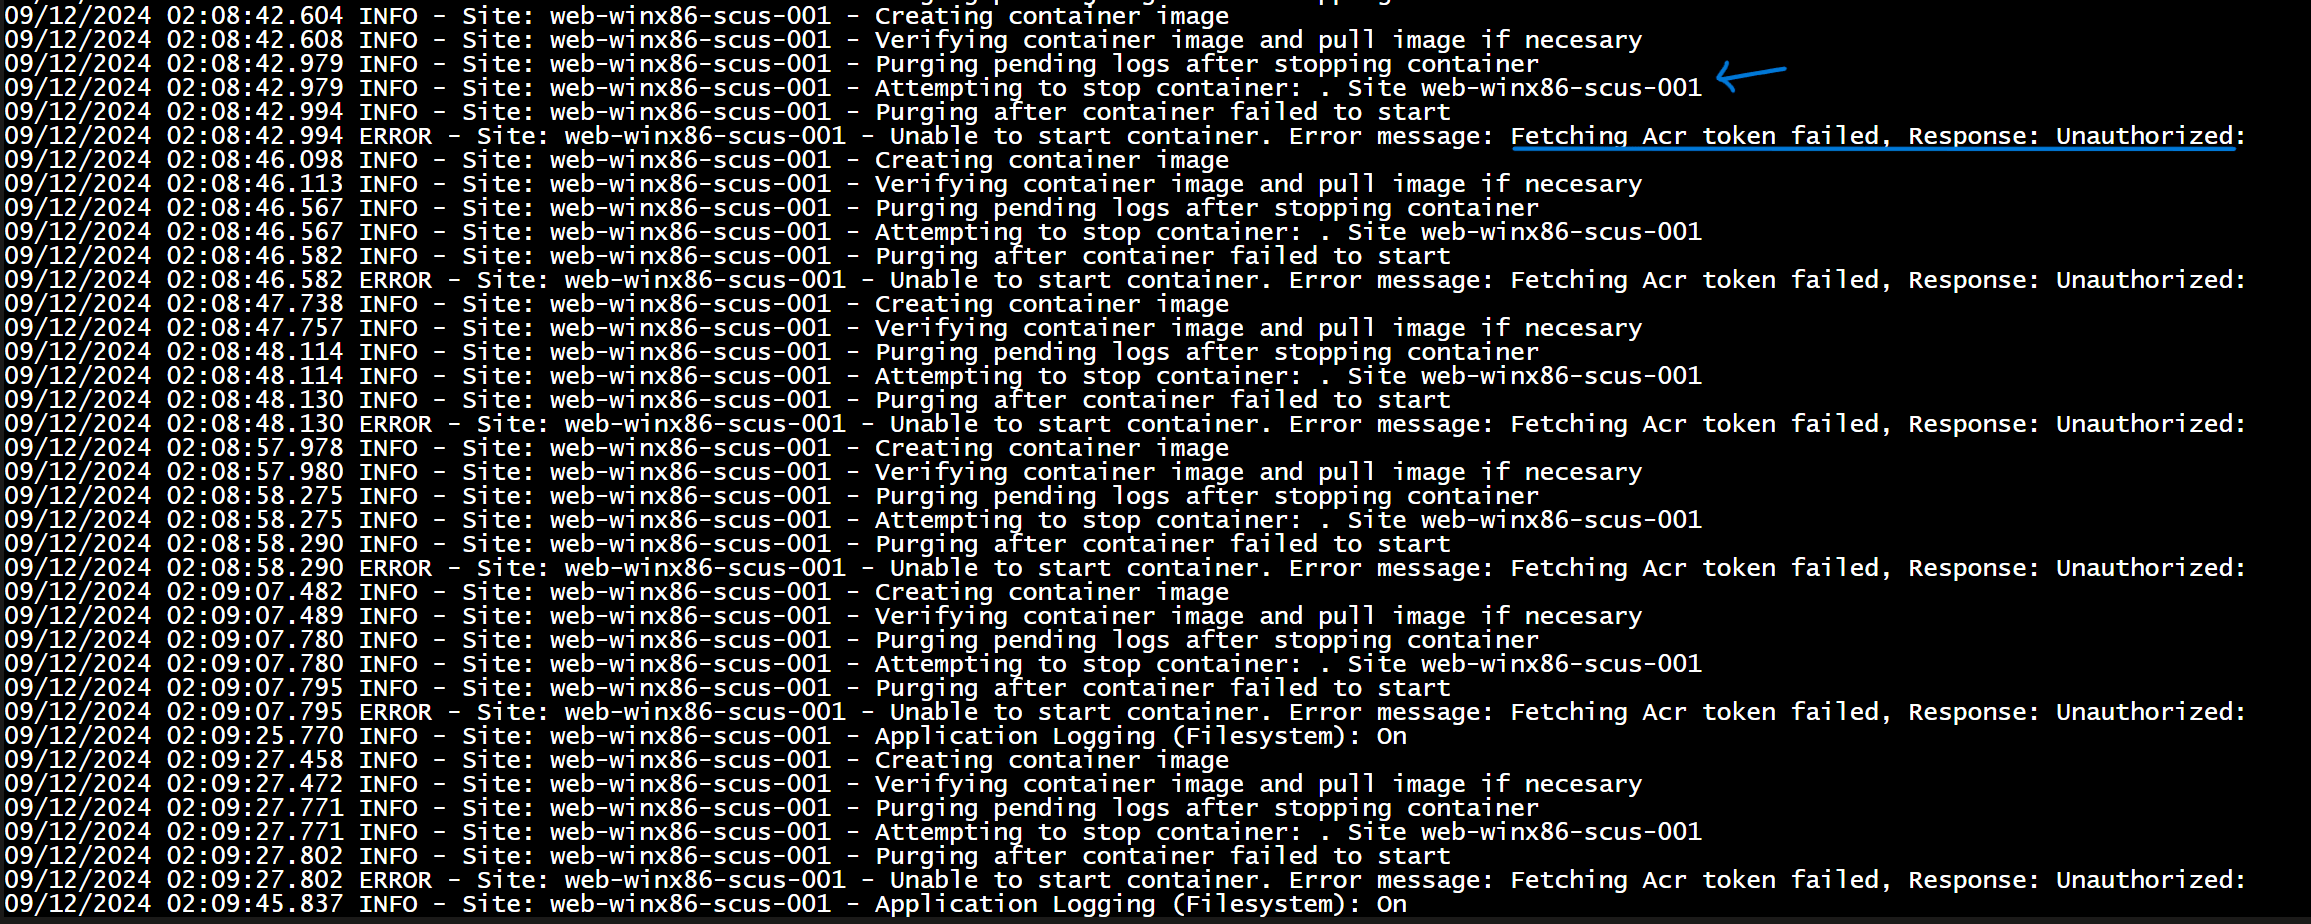
The App Service needs permission to pull images from ACR. If this step is skipped, the container will fail to start.
 1
 2
 3
 4
 5
 6
 7
 8
 9
10
11
12
| # Find the system identity id and the az acr id
$userID = (az webapp identity show --resource-group rg-x86app-scus-001 `
--name web-winx86-scus-001 `
--query "principalId" `
--output tsv)
$resourceID=$(az acr show --resource-group rg-experiments-soutchcentralus-001 `
--name acrlpains `
--query id `
--output tsv)
# Grant the system identity acrpull role in the ACR resource
az role assignment create --assignee $userID --scope $resourceID --role acrpull
|
Results#
Your app should now be running and responding to web requests:

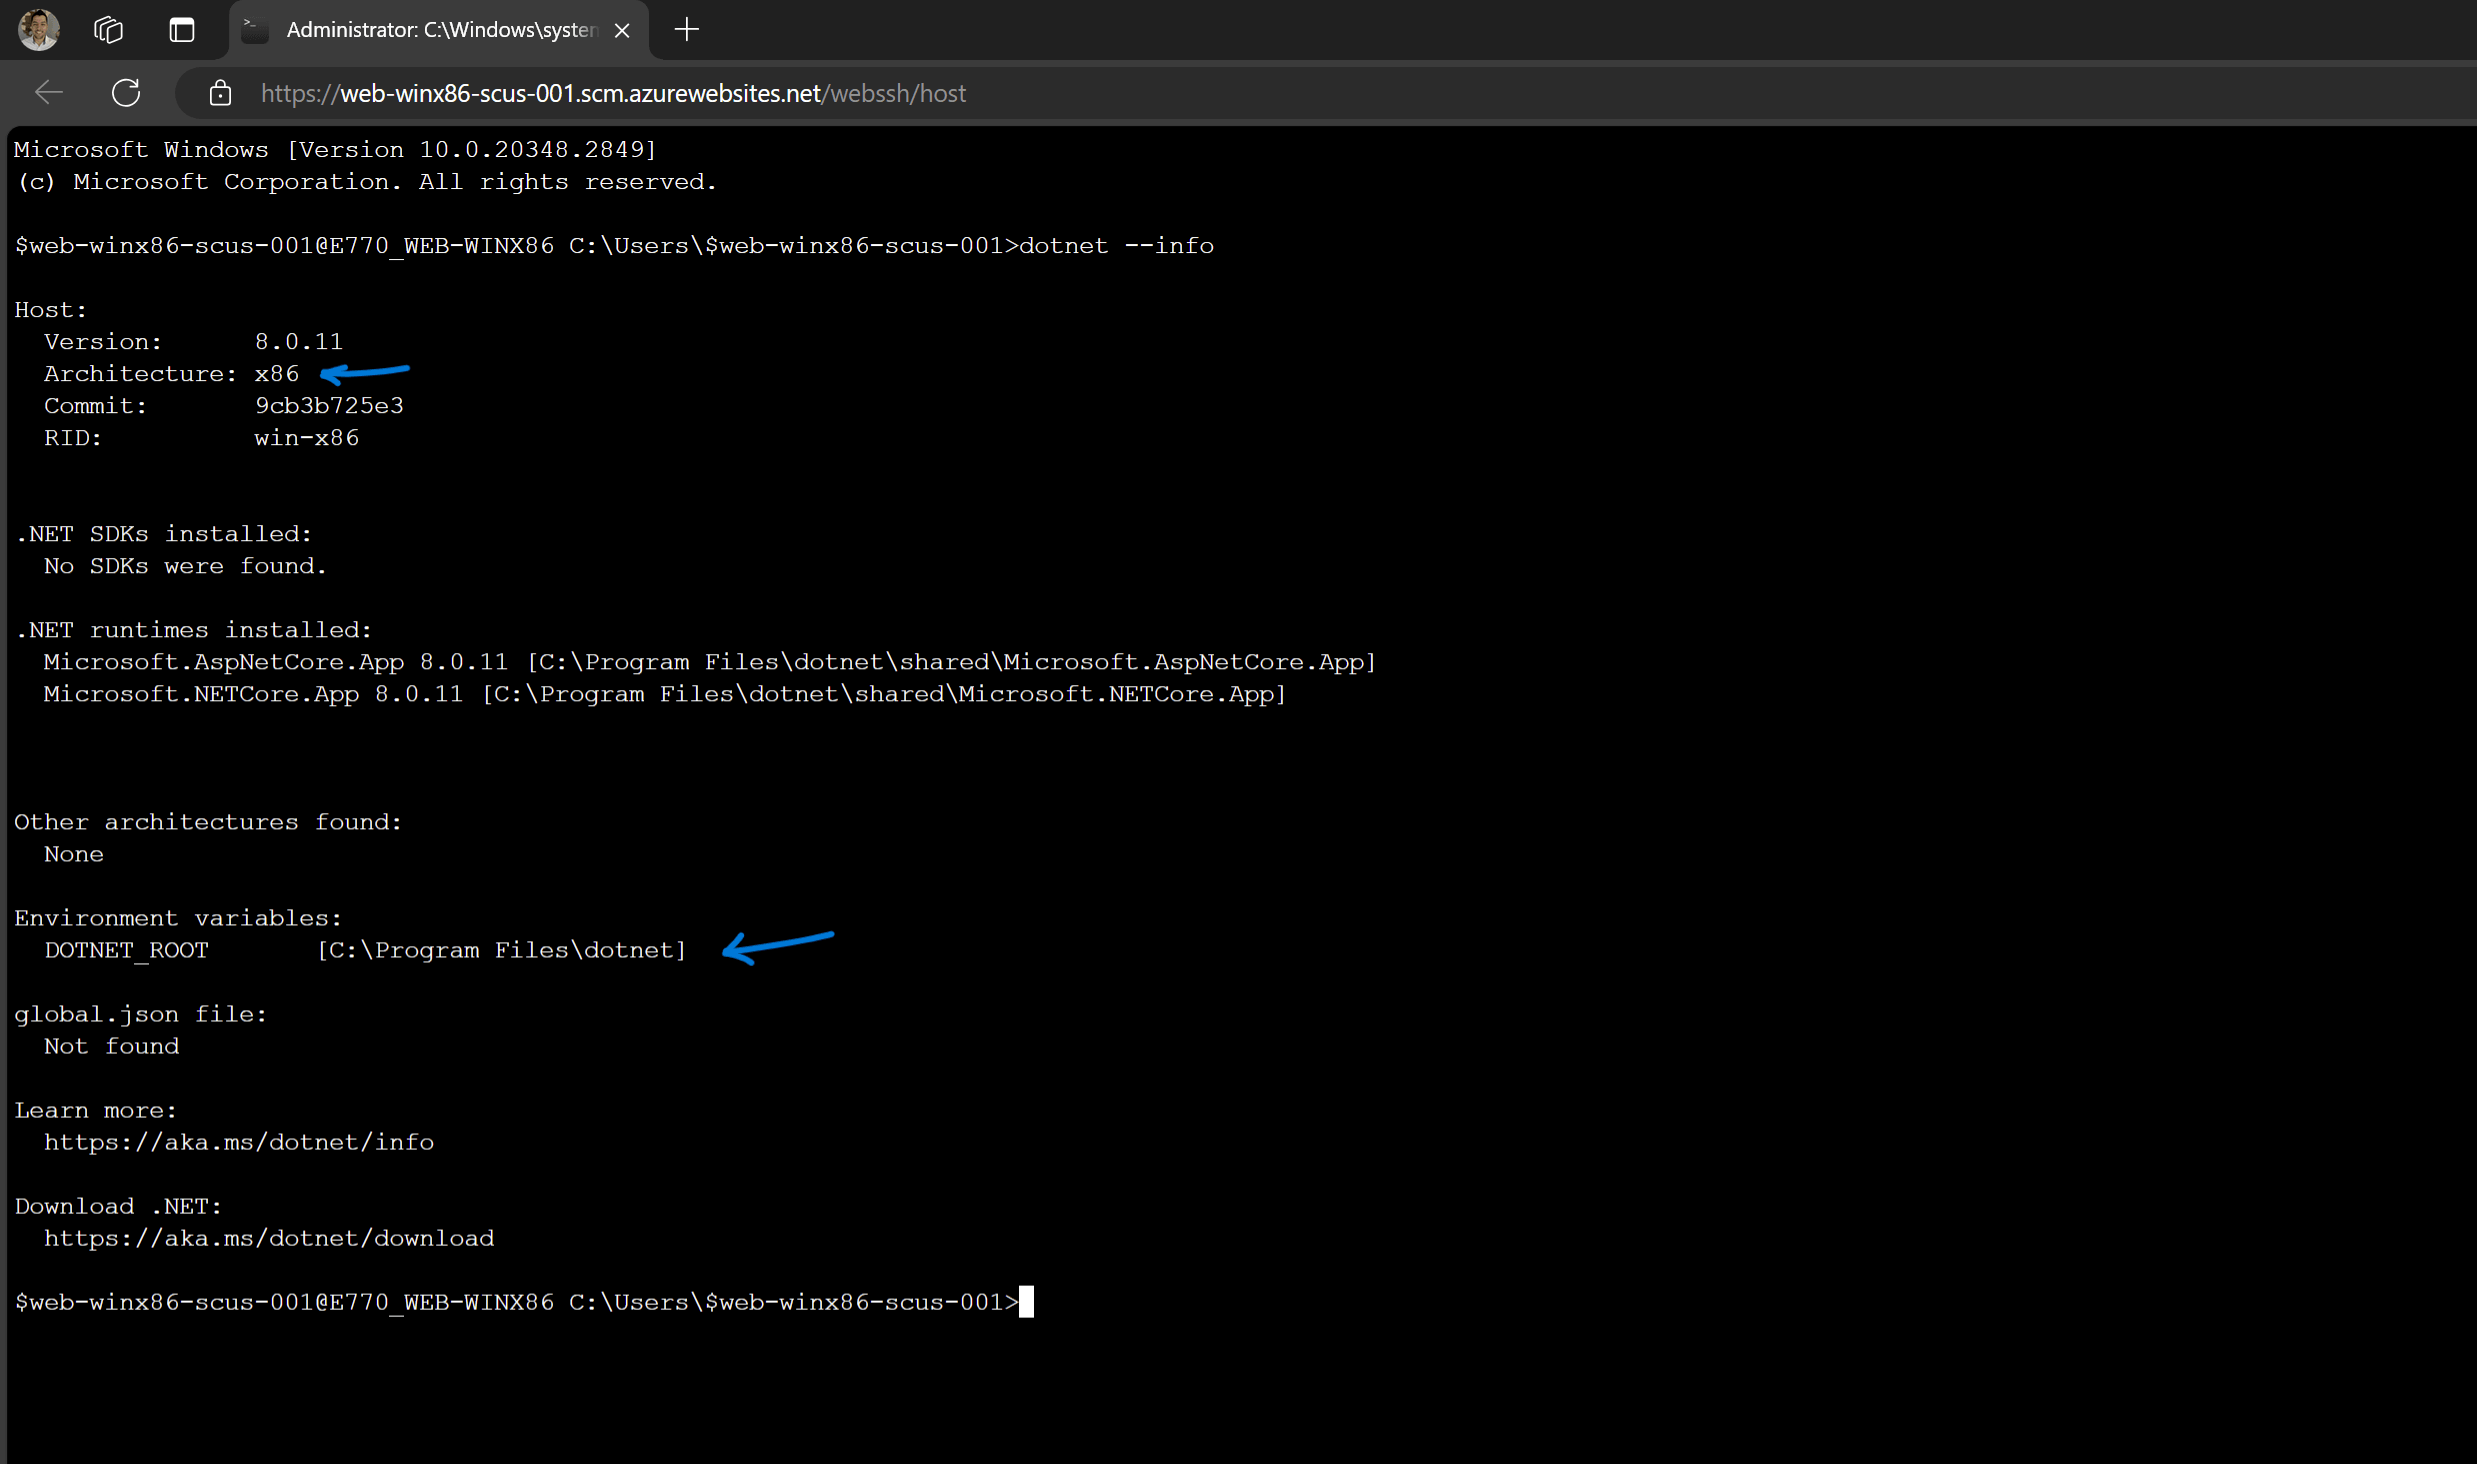
You can confirm it’s running on x86 architecture by using the dotnet --info command via an SSH session in Azure App Service:

Common Issues and Fixes#
1. “You must install .NET to run this application.”#

Fix: Ensure the .NET and ASP.NET runtimes are installed, and DOTNET_ROOT is set correctly.
- “The app architecture doesn’t match the .NET runtime architecture.”

Fix: Download the x86 version of the runtimes, not x64:
1
2
3
| Invoke-WebRequest -OutFile aspnetcore.zip https://dotnetcli.azureedge.net/dotnet/aspnetcore/Runtime/$Env:ASPNET_VERSION/aspnetcore-runtime-$Env:ASPNET_VERSION-win-x86.zip;
...
Invoke-WebRequest -OutFile aspnetcore.zip https://dotnetcli.azureedge.net/dotnet/aspnetcore/Runtime/$Env:ASPNET_VERSION/aspnetcore-runtime-$Env:ASPNET_VERSION-win-x86.zip
|
3. “The container will not start because the image cannot be pulled.”#

Fix: Grant the acrpull role to the App Service’s system identity and restart the app.
Conclusion#
While deploying a 32-bit .NET app isn’t common, there are scenarios where it’s necessary. Using this guide, you can successfully deploy it in Azure App Service. The container image is large (~5GB), but it’s still more efficient than running a full VM. With a bit of effort, it’s entirely achievable.
Cheers,
Lucas


